

Compute
インスタンスを管理する
稼働中のレンタルに対する操作はすべて、Instances と題された My Instance で行います。接続する、ポートを公開する、期間を延長する、ファイルをアーカイブする、といった操作です。“No results found.” は何も動いていないという意味です。まずは GPU インスタンスをデプロイする から始めてください。
- プロビジョニングが完了し、カードが Active になっているレンタル。
- Manage compute 権限(権限の一覧)。
- SSH クライアント。Windows 10 と 11 には同梱されています。
sshが見つからない場合は「OpenSSH クライアント」オプション機能を追加してください。
インスタンスカード
Section titled “インスタンスカード”レンタルごとに 1 枚のカードがあり、Connect、Web Access、Renew、Backup のアクションが並びます。
- ノード — サプライヤーと所在地、GPU 名とその VRAM、IP Address、CPU モデル、Cores、Speed、Mbps 単位の Download と Upload、そして Disk Space。
- Status — Active または Inactive。ライフサイクルではなく、コンテナのオン/オフをそのまま示すものです。新しいレンタルは、プロビジョニングが終わると Active に変わります。
- 使用率バー — CPU Utilization、Disk Utilization、そして GPU インデックスごとの GPU Utilization。エージェントがメトリクスを報告するまでは No data と表示され、起動から数分かかります。
- フッター — Running grafilab/jupyterlab:2026-06-09 と Expire at 9 Sept 2026, 04:32 am MYT(レンタルが終了する時刻)。
SSH で接続する
Section titled “SSH で接続する”-
In the console open My Instance (
https://app.grafilab.ai/orders) and find the card for your instance. Wait until its status reads Active. -
Click Connect. The Connect with SSH dialog shows an SSH Connect command and a Password.
-
Copy the command into a terminal, press Enter, and paste the password when prompted. You land in a root shell inside the container.
コマンドは、ノードに Grafilab のプロキシ経由で到達するか、ノード自身のアドレスに到達するかで、2 つの形のいずれかになります。
ssh <your-slug>@<ssh-proxy-host> -p <port># orssh <username>@<ip-address> -p <port>自分で組み立てず、ダイアログに表示されたものをコピーしてください。ダイアログには Reset Password と Close もあります。パスワードを入力しても画面には何も表示されませんが、それが正常です。root として GPU がアタッチされた状態で入り、nvidia-smi にはすぐカードが表示されます。
パスワードをリセットする
Section titled “パスワードをリセットする”パスワードが使えなくなった場合は、Connect ダイアログの Reset Password をクリックします。確認画面は “Are you sure you want to proceed with password reset?” と尋ね、“It might take a little while for the changes to be reflected. Thank you for your patience.” と注意します。Yes を選ぶと、成功時に “Password reset was successful.” と表示されます。Connect を開き直すと、新しいパスワードを確認できます。
ファイルを送受信する
Section titled “ファイルを送受信する”SSH コマンドと同じポートを使います。
# push a dataset to the instancescp -P <port> dataset.zip <your-slug>@<ssh-proxy-host>:/root/
# pull results back, resuming if interruptedrsync -avP -e "ssh -p <port>" <your-slug>@<ssh-proxy-host>:/root/outputs/ ./outputs/
scp は大文字の -P、rsync のトランスポート文字列の中は小文字の -p である点に注意してください。
SSH が接続できないとき
Section titled “SSH が接続できないとき”- 起動直後の
Connection refused— コンテナがまだ立ち上がっていません。カードが Active になるまで待ってから再試行してください。 Permission denied— パスワードが再生成されています。Connect ダイアログの Reset Password をクリックし、開き直して新しいパスワードを確認してください。- SSH ではコマンドが動くのに CUDA や conda が見つからない — プラットフォーム層はイメージ自身の環境をログインシェルにエクスポートしますが、対象は
bashだけです。対話シェルが bash でないイメージでは、自分で環境を読み込むか、バイナリをフルパスで呼び出してください。
Web サービスに接続する
Section titled “Web サービスに接続する”Web UI を備えたテンプレートは、すでにポート 80 の https://<your-slug>.instance.grafilab.ai で応答しています。自分で起動したそれ以外のものには Web Access を使います。
このダイアログには Details と List の 2 つのタブがあります: “Expose a running service inside your instance to the internet. Each port mapping creates a public proxy URL (e.g. <slug>-<service_name>.instance.grafilab.ai) that routes traffic to the specified port in your container.”
Details では次を指定します。
- Service Name — “A unique label for this port mapping. Used to generate the proxy URL.” 使えるのは英数字とハイフンのみで、
sshは予約されています。プレースホルダーの例はjupyter、api、webuiです。 - Port — “The port your service is listening on inside the container (1–65535).” プロセスが実際にバインドしているポートです。
127.0.0.1ではなく0.0.0.0にバインドされている必要があり、そうでないとプロキシから到達できません。 - Custom Domain (Optional) — “Point your own domain to this service. Set a CNAME record in your DNS pointing to the proxy URL shown in the list.”
マッピングは https://<your-slug>-<service>.instance.grafilab.ai になります。List タブにはすべてのマッピングが表示されます — Service Name、Port、Proxy URL、Custom Domain、そして Delete で 1 行を削除できる Action 列です。一番下の Total Proxy: は、このインスタンスのマッピング数を数えたものです。
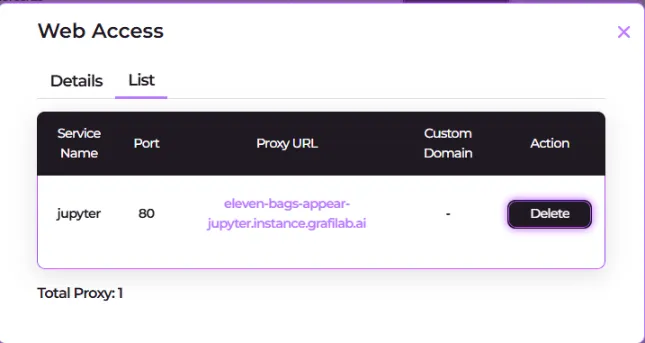
カスタムドメイン
Section titled “カスタムドメイン”-
Web Access → Details で、Service Name、Port、そして Custom Domain (Optional) にホスト名を入れて、先にマッピングを保存します。
-
List タブを開き、その行の Proxy URL をコピーします。これが CNAME の向き先です。
-
DNS プロバイダーで、自分のホスト名からそのプロキシ URL への CNAME レコードを追加します。レコードが伝播すると、自分のドメインで応答するようになります。
Anyone with the URL can reach your web UI
The Grafilab proxy does not add a login in front of your instance. Your random three-word slug (https://<your-slug>.instance.grafilab.ai) is the only barrier, and the shipped web templates have no application login of their own (Open WebUI is the exception). Treat the URL like a password: don’t paste it in public places, and if you need a lock, add one inside the app over SSH.
レンタルを延長する
Section titled “レンタルを延長する”インスタンスは Expire at まで動き、それ以降は動きません。その時刻より前に Renew をクリックしてください。
-
インスタンスカードで Renew をクリックします。ダイアログが “You may renew your rent & run before the expiry date.” とともに開きます。
-
期間を選びます。このノードの Price per hour が表示されるので、延長にかかる金額が分かります。
-
Payment の方法を選びます。カードの選択肢は Visa or Mastercard と表示され、クレジットで支払う場合は Balance: が表示されます。
-
Confirm をクリックします。“Rental renewal was successful. The system is updating your expiry date and it will be visible shortly.” と表示されます。
新しい Expire at は支払いの行が確定してから反映されます。これは常に即時とは限らないので、2 回更新せず、1 分ほど待って再読み込みしてください。請求は レンタルと請求履歴 で追跡できます。
期限が来たときに起こること
Section titled “期限が来たときに起こること”Expire at になるとコンテナは削除され、ノードはマーケットプレイスに戻ります。レンタルを途中で止めるボタンはなく、使わなかった時間の返金もありません。延長したいときは更新し、時間切れになる前に成果物をアーカイブしてください。
データをバックアップする
Section titled “データをバックアップする”Backup は、コンテナ内のフォルダーを Grafilab ストレージにアーカイブし、レンタルより長く残る .tar のダウンロードを提供します。Expire at よりかなり前に始めてください。
Nothing persists past the rental
Instances have no persistent volume. Anything you write at runtime — downloaded models, installed packages, notebooks, outputs — lives in the container for the lifetime of the rental and is gone when it expires. Before Expire at, back up the folders you care about to Grafilab storage and download the archive.